Welcome to the Web! Web Development with Shiny 101
Last updated on 2025-04-15 | Edit this page
Overview
Questions
- How is a website built?
- How is building a website using R Shiny similar to/different from the “usual” way?
- What does a website “look like,” under the hood?
- What are the most common website “building blocks?”
Objectives
- Meet the web development languages.
- Describe how R Shiny relates to other web development frameworks.
- Picture a typical website’s underlying structure.
- List several typical website components.
- Establish a working familiarity with HTML and CSS.
Important: This course assumes you have working knowledge of the R programming language and of the RStudio Integrated Development Environment (IDE). If either is unfamiliar, you could struggle with this lesson (although the “normal R code” used is relatively basic). By contrast, this course assumes no web development experience. If you have some, this course may be too introductory/simplified to hold your attention, though you may still find it useful as an overview of the R Shiny framework.
The web’s languages
R is a programming language, a system with which we direct a computer to do things for us.
Just like a human language, R possesses:
“Nouns” (objects or variables),
“Verbs” (functions),
“Punctuation” (operators like
<-and%>%),“Questions” (logical tests like
x == 1),“Adjectives” (the types and classes possessed by objects) and “adverbs” (optional parameters of functions), and
“Grammar/syntax” (rules like
1abeing an unacceptable object name buta1being valid).
To have a successful “R conversation,” we must form valid “sentences” (commands) in which we create and manipulate nouns, subject them to verbs, and follow all the rules, just as we would with a human language.
R Shiny, meanwhile, is not a programming language. Instead, it (in combination with R) is what a web developer would call a framework: a suite of tools for building a website. Specifically, it leverages R and its conventions/grammar/syntax to accomplish that task as opposed to using other, comparable tools.
To appreciate how R Shiny is distinct from other frameworks, and to understand how to use it well, we need to understand a few basic things about “normal” web development:
The languages typically used to build websites, what each is for, and how each basically works.
The structure of a typical website (the “wheres”).
The typical components (the “whats”) of a website.
These will be this lesson’s first set of topics.
How to weave the web
To generalize, a website is typically constructed using several languages, each specializing in a particular role. The most notable of these are HTML, CSS, and JavaScript (JS for short):
HTML structures a website. It’s how web developers specify what elements a user can see and where these go on a page.
CSS styles a website. It’s how web developers specify how each element should look (colors, size, borders, fonts, etc.).
-
JavaScript codes a website’s behaviors. We’ll dissect this further later, but a website is in many ways an application that runs inside your browser (e.g., Edge or Safari). Any changes to the website while its open are likely coded in JS.
- For example, if a webpage contains a button, and if the button disappears when pressed (a shift in the site’s HTML), the page turns green (a shift in the site’s CSS), and some data you provided are sent to a database (a shift in the app’s relationship with the wider internet), JS is likely orchestrating all three shifts.
Together, HTML, CSS, and JS are the languages most commonly used to assemble the “front end,” “user interface,” or “client side” half of a website. A website’s user interface (UI for short) is what a user sees and interacts with. As far as most users are concerned, the UI is the website. Most assume a website is just that “one thing” and that the website lives somewhere “out there,” on the internet, and we just use our browsers to visit that “other place.”
However, the truth is a bit more complicated! First, yes, there is always a second “half” to a website, and, in defense of the average person’s intuition, it is “somewhere else.” Somewhere in the world, a server (a computer, basically, but more automated than a personal computer) acts as a website’s host, receiving requests for information and sending that information out to users. A server might also store private data, such as passwords, or do complex operations that’d be awkward to have a user’s computer do. It also may perform security checks to ensure users aren’t trafficking malware or spam.
For all these purposes and more, websites have “back ends” or “server sides” that run on a server. Here, the SQL language might be used to carefully store or read data from large databases, and a whole host of other programming languages might be used to perform complex operations and other tasks. These include JS but also PHP, Python, Ruby, and C#, just to name a few!
When a web developer talks about a framework, they are referring to the entire set of languages/constructs needed to build both halves of a website. So, for example, HTML + CSS + JS (front end) + PHP + SQL (back end) is a framework.
Now that we know of the two “halves” of a website, we can consider how a website actually works:
When you “visit” a website by typing its URL into your browser, your browser sends a request out to a server for permission to “see the website.”
The server responds by sending your browser a packet of files (a bunch of HTML, CSS, and JS files, perhaps).
These are opened by your browser and deciphered (it’s fluent in these languages).
Your browser then builds the website you then see and interact with per the instructions provided in the files the server sent. The website is not “out there somewhere;” it’s “alive” and running on your computer!
When the website needs “further instructions” for how to behave in response to your actions or what content to show you next, the dialogue with the server continues—new requests are sent, and new files are received and deciphered.
Discussion
Have you ever had to clear your browser’s cache? What do you think gets deleted when you do that?
A good portion of your cache (in terms of numbers of files, anyway) will be HTML, CSS, and JS files sent to you by servers to build websites you’ve visited! However, there will also be image and video files (which can be very bulky), files for special fonts that website wanted you to use (perhaps because their logo uses them), and JSON files (text files that can store data), among others.
Where R Shiny sits
When you build a website using R Shiny, you’ll write (primarily) two styles of code:
“Normal” R code, and
What I’ll call “R-like,” or “R Shiny” code.
The latter will look a lot like R code (that’s the point!). However, it won’t remain R code. When a Shiny app is compiled, its R Shiny code is translated into the equivalent HTML, CSS, and JS code so a browser can decipher it. This means we can use R Shiny and it’s “R-like” code to build the entire UI side of a website without needing to know much, if any*, HTML, CSS, or JS (*sort of)!
The “normal” R code you’ll write, meanwhile, will largely sit within your website’s “back end’ (or”server side”), where it may manipulate data sets, perform operations, generate graphs, etc. You know—typical R stuff! This means we use R+R Shiny to build the entire server side of a website without needing to know much, if any, JS, PHP, Ruby, Python, SQL, etc!
So, the R + R Shiny framework enables us to build both halves of a fully interactive, complex website without necessarily knowing any other web development languages or frameworks! In particular, R admirably takes the place of other, general programming languages typically used for handling server-side tasks, such as Python or PHP, especially when those tasks revolve around data manipulation, management, or display—R excels at all things “data!”
Discussion
Hopefully, you now recognize that websites can be built both with and without R Shiny. What is different about building a website using R Shiny, then?
A few things are different about building a website using R Shiny, but I think the two most important are:
Whereas writing HTML, CSS, and JS code is often necessary to build a website’s UI, (deep) knowledge of these languages is not required to build a website using R Shiny. Instead, you will write R code + R Shiny code, and these get “translated” into the equivalent HTML, CSS, and JS code for you.
Granted, this means you still need to learn how to write “R Shiny code,” and you may or may not find this code all that familiar-feeling even though it “looks like” R code. More on that in a sec…Normally, to construct the “back end” of a website, a general programming language like PHP or Python is used. These languages are quite different from JS, so designing a conventional website often requires programming in (at least) two different general programming languages (e.g., JS and PHP), at least one of which you may not have encountered before (JS and PHP are not widely used for other purposes).
With R Shiny, you can code both the front and back ends of a website using the “look and feel,” at least, of just one general programming language.
Let’s meet HTML and CSS
I said above that R Shiny ensures you don’t need to learn HTML and CSS to build a website. That statement is no lie!
…However, because your R Shiny code must be translated into HTML/CSS code for a browser to understand it, there is a forced similarity between the two systems—much of the time, you’ll really be writing just thinly veiled HTML/CSS code when you’re writing “Shiny code.” The latter may look “R-like,” but it won’t always feel “R-like” because of all the ways it will be beholden to these other two languages.
As such, to build a really nice Shiny app, and to feel like you know not just what your code is doing but why it looks the way it does, it’s helpful to understand the basics of HTML and CSS.
If the prospect of learning two more languages is daunting, don’t panic! Compared to learning R, learning the basics of HTML and CSS is much easier; these aren’t general programming languages like R. They have much narrower purposes, so they need a lot fewer “words” and “rules” to do their jobs than R does. Knowing even a little about these two languages goes a long way, I promise!
HTML 101
We’ll start with HTML, since it’s a website’s foundation. Pretty much everything an R Shiny developer really needs to understand about HTML falls under four key concepts:
Key concept #1: All websites are “boxes within boxes”
At its core, every website is just a box containing one or more additional boxes, each of which might contain yet more boxes, and so on all the way down. By “box” here, I mean “a container that holds stuff,” not “a rectangle” (though a lot of website boxes are rectangles!). All HTML does is tell your browser which boxes go inside which other boxes and what every box contains. Besides other boxes, HTML boxes can hold text, pictures, links, menus, lists, and much more.
In terms of code, every HTML box looks something like this:
Thus, (almost) every HTML box has:
An opening tag (e.g.,
<div...>), which tells the browser where the box “starts.”A closing tag (e.g.,
</div>), which tells the browser where a box “ends.”Space for contents (here, that’s the text
My box's contents), found between the opening tag’s>and the closing tag’s<.-
Space inside the opening tag for attributes, which are adjectives that make a box “special.”
- Here, we gave our box a unique
id,"my_box", usingattribute = "value"format.
- Here, we gave our box a unique
In R Shiny, you can build the exact same box using its “R-like code:”
R
div(id = "my box",
    "My box's contents")
Here, we’ve replaced HTML’s tag notation involving
<>s with R’s function notation and
its ( )s, and we specify attributes and box contents using
R’s traditional function arguments instead.
Importantly, as I said above, one thing every HTML box can contain is one or more additional HTML boxes. In fact, most websites contain nested layers of boxes, each with their own unique properties, that go many, many layers deep:
R
div(id = "my box",
    div(id = "layer2",
        div(id = "layer3", ...)))
It’s through this nesting of boxes that the complex visual structure of a typical website is born.
The above code contains one outer HTML box with both an
id attribute and a class attribute. R Shiny
has equivalent function parameters for those two
attributes in its div() function:
R
div(id = "main-container",
    class = "container",
    #...contents go here.
    )
In this example, this outer div’s contents are another
div, which itself has a class and some text contents:
R
div(id = "main-container",
    class = "container",
    div(class = "content",
        "Welcome to our app!") #Text strings need to be quoted in R even though they don't in HTML.
    )
While nesting many function calls inside one another is not an uncommon practice among everyday R users, it’s certainly not universal, but it’s essential to coding in HTML, so some find the amount of nesting found in R Shiny UI code to be unfamiliar.
Key concept #2: Websites have heads and bodies
To oversimplify, every website is an HTML box
(<HTML>...</HTML>) containing two smaller
boxes: a “head” (<head>...</head>) and a “body”
(<body>...</body>).
The head’s contents are (mostly) invisible to users; the head contains instructions for how the browser should construct the website. The body box, meanwhile, contains everything the user can see and interact with.
In R Shiny, we don’t need to build the HTML, head, or body boxes—those are made for us. Instead, we’d spend most of our time specifying only the stuff that goes inside the body box.
However, we can (and sometimes need to) put things in the head box to
provide our users’ browsers with more guidance. This is done using the R
Shiny tags$head() function:
Key concept #3: HTML boxes are either inline or block
Broadly, there are two kinds of HTML boxes: inline and block. The difference is how each is displayed when a website is built.
A block element takes up the entire horizontal “row” it is placed on. In other words, it’ll occupy the entire width of the browser window (if allowed), and it’ll force the next item to go below rather than next to it, as though the browser was forced to hit the “Enter” key.
For example, the <p>...</p> element (created
in Shiny using the p() R Shiny function) creates
“paragraph” boxes (or, more accurately, boxes for text blocks, which can
any amount of text). If you put several consecutive paragraph boxes
inside your body box, they would display in a column, with the first at
the top and the last at the bottom, and each would occupy the full width
of the box that contains them:
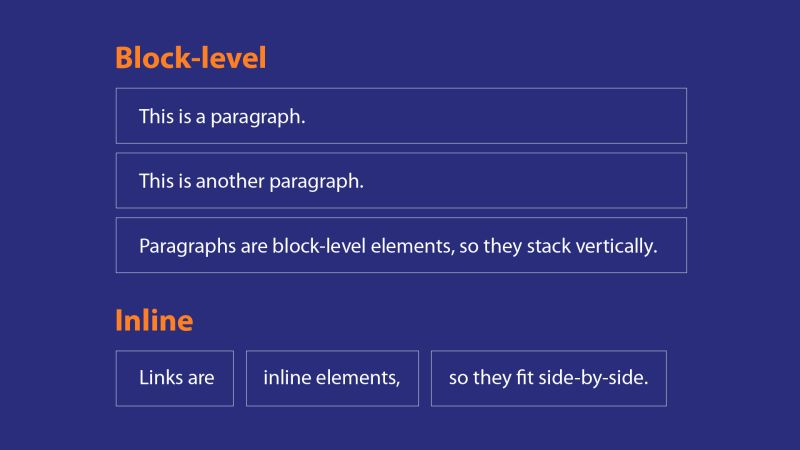
Inline elements, meanwhile, only take up as much horizontal space as they have to (by default) to accommodate their contents’ size, and thus they go next to each other on the same line (if there’s room); they don’t force new lines.
For example, the <a>...</a> element (made in
R using the a() R Shiny function) is a box that holds a
link to a URL or file. You could use several such boxes within a single
paragraph box without spawning a new line after each one.
HTML
<!-- HERE'S HOW YOU'D RECREATE THE IMAGE ABOVE IN HTML -->
<div>
<h1>Block-level</h1>
<p>This is a paragraph.</p>
<p>This is another paragraph.</p>
<p>Paragraphs are block elements, so they stack vertically.</p>
<h1>Inline</h1>
<a>Links are</a>
<a>Inline elements,</a>
<a>so they fit side-by-side.</a>
</div>
R
#And here's the exact same code, only written in R Shiny code instead:
div(
  h1("Block-level"),
  p("This is a paragraph."),
  p("This is another paragraph."),
  p("Paragraphs are block elements, so they stack vertically."),
  h1("Inline"),
  a("Links are"),
  a("Inline elements,"),
  a("so they fit side-by-side")
)

#Note that text contents are quoted. Note also that commas separate every UI element from the next.

#Lastly, note that the line breaks between elements here (and in the HTML code above) are irrelevant with respect to the code's effects--paragraph and heading boxes would still stack vertically without them, and links still will fit side-by-side with them.
This dichotomy means every element of every website falls into one of two aesthetic camps. Certain elements tend to “stand alone” or “stand apart” from others visually and logically, such as headings and navigation bars. These are generally block elements. Other elements “fit together” and “co-mingle,” such as links and images. These are generally inline elements.
Key concept #4: The Flow
These days, a user might view your website on a very wide screen (like that of a projector) or a very narrow screen (like that of a cell phone in portrait mode, or even the screen of a smart watch!).
If your website has, say, five elements, it may not make sense to arrange those elements the same way on a narrow screen as on a wide screen, just as you probably wouldn’t arrange the same furniture in a tiny room the same as you would in a huge room.
Careless arrangement of elements is often obvious to even casual web surfers. On narrow screens, elements that are too big might “spill” out of the containers meant to hold them, and when too many elements are stacked side by side, tedious scroll bars may be the only way to see elements that are otherwise obviously extending “off-screen.”
On wide screens, meanwhile, small elements (especially small block elements) may look silly without constraints, such as when a single sentence spans the entire width of the screen. As another example, font sizes that feel appropriate on a small screen might be far too big or small when viewed on a computer monitor.
It’s hard enough to craft one great website—it’d be a nightmare to design a different-looking website for every possible screen size your users might have!
Thankfully, then, most websites are designed to follow some paradigm of “flow.” This means they’ll semi-automatically reorganize their contents according to the size of the user’s screen. For example:
Elements that sit side by side on a wide screen shift to stack vertically.
Elements (such as images) that might be permitted to stay large for wide screens may shrink to fit comfortably inside their boxes on narrow screens.
Some elements may “teleport” to new locations on the page as a screen narrows such that, if all elements are arranged vertically, their order is more logical to a user encountering them in that way.
Challenge
Try it: Go to dictionary.com and vary the width of your browser window by pulling its edges inward. How does this website “flow?”
For me, I saw a number of changes as I shrunk my browser screen: The menu at the top became a collapsed “hamburger” menu (a button with three lines that opens to reveal options), the links section slid below the search bar, the word of the day box shrank to take up less room, and the games sidebar teleported to much further down on the page. You may have noticed many other changes!
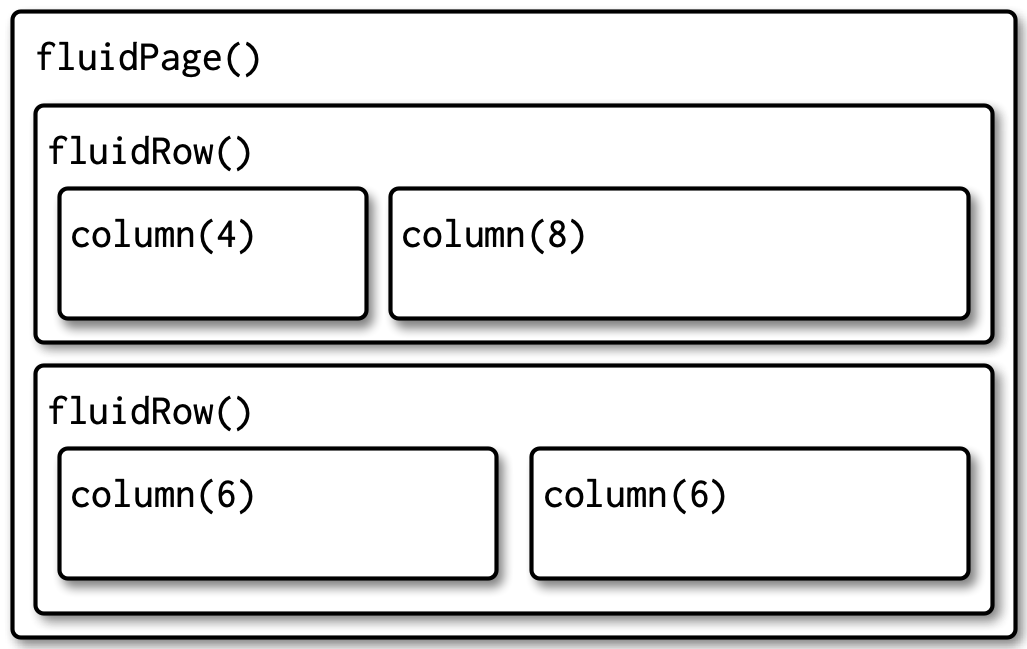
In line with this, R Shiny comes with custom boxes that are “fluid,” meaning their size is flexible and changes automatically to fit the size of their contents. Like inline elements, these boxes will only take up as much space as necessary. However, their contents will also automatically stack vertically if the screen becomes too narrow, sort of like block elements. Additionally, these boxes includes ones that will divide a space into a table of “rows” and “columns” so that elements can be arranged in a grid-like fashion whenever the screen is wide enough to accommodate it:
The first step of building a great Shiny app is to plot out your app’s layout. What elements should exist, and where should they go? How big does each need to be? What kinds of devices will your users be on? How will elements be nested to achieve a pleasing “flow” of elements, no matter the device your user is using? It’s important to remember that your app may not be able to look the exact same for every user and to design it with that in mind!
CSS 101
If HTML tells a browser what to display and where to display it, then CSS tells a browser how to display things.
Compared to HTML, CSS is even easier to learn (at least, that’s my opinion!). CSS code consists of functional units called rules. Each rule consists of a selector and a list of one or more property-value pairs:
The selector tells the browser which box(es) to adjust the appearance of.
The properties tell the browser which characteristics of those boxes to change.
The values tell the browser the new values to set for each of those characteristics.
Here is an example CSS rule:
On the first line prior to the opening brace, {, we have
our selector, which here is targeting two different
groups of boxes simultaneously, with those two targets separated with a
comma:
- The first target is paragraph boxes (
p()s), but only those with theintroclass attribute. A class is actually an HTML attribute that allows many boxes to be controlled and styled as one group. A period connects an HTML element type with a class name in a CSS selector (e.g.,p.intro).
-
Our second target is
divs (a highly generic HTML box), but only the one with the id attribute offirstintro.ids allow us to control or style just a specific element. A hashtag connects an HTML element type with anidname in a CSS selector (e.g.,div#firstintro).To target all elements of a type (e.g., all
div()s), write only the element name without any periods or hashtags (e.g.,div)If multiple different element types (such as
divs andps) have the same class, you can omit an element type and just specify the class to target all those elements with the same CSS rule (e.g.,.intro).
Challenge
Consider the following elements. Which ones do you think would be
affected by a CSS selector of p.intro?
R
p(class = "intro")
p(class = "intro special")
p(class = "body")
p(id = "intro")
a(class = "intro")
Answers can be found embedded in the code below:
R
p(class = "intro", "This p element has the intro class and would be affected by a CSS selector of p.intro.")
p(class = "intro special", "This p element actually has two classes, 'intro' and 'special' (multiple classes can be applied if they are separated with a space). Since one of those classes is 'intro', this element would be affected by the selector p.intro.")
p(class = "body", "This p element does not have the specific class 'intro' and would thus be unaffected by the selector p.intro.")
p(id = "intro", "ids and classes are different attributes, so this p element would be unaffected by the selector p.intro, but it would be affected by the selector p#intro.")
a(class = "intro", "An a (link) element is different from a p element, so the selector p.intro won't affect this element even though the element does have the 'intro' class. It would be affected by the selectors .intro and a.intro though.")
Inside of our rule’s braces, meanwhile, we have a list. Each list
item is a property name (e.g.,
font-style) and a new value
(e.g., italic) to set for that property. These are
separated with a colon and end with a semi-colon. If you get the
punctuation or spelling of a CSS rule wrong (easy to do!), it won’t do
anything, so mind the rules carefully!
CSS rules get more complex than this one, but they can be simpler than this one too, so if this rule makes sense to you, you’re in great shape!
Challenge
Try it: W3Schools is a fantastic resource for learning HTML and CSS. Go to their CSS page and check out some of the tutorial pages on the left-hand side.
Using the “CSS Text” tutorial, write a CSS rule that would change the font color of all paragraph boxes to red and make all their text be center-aligned.
Here’s how you’d write this rule:
Notice that we can target all p elements by not
appending any classes or ids. Don’t forget your colons, braces, commas
(if needed), or semi-colons! Also, notice that, unlike in R, text values
in CSS (like “red” and “center”) aren’t
quoted.
If you’re thinking “This sounds complicated/tedious/off-topic! Why are we bothering to learn any CSS, when R is going to translate my Shiny code to CSS for me??”
That’s a good and fair question! The truth is that, unfortunately, understanding CSS to some degree is still essential for crafting an attractive R Shiny app. Without specifying your own CSS, you’ll need to:
Accept the very basic styling employed by R Shiny by default, or
Use generic-looking themes available from packages like
bslibthat might leave your app looking like “every other website” in ways that can be difficult to customize.
Don’t get me wrong—these are perfectly acceptable options if your apps are simple or have limited user bases that may be indifferent to looks. However, in my experience, even in those instances, neither option is nearly as satisfying as learning to style your app yourself, even if you’re not a design whiz!
So, while we won’t pause to style our app much in this series of lessons, we will do so occasionally so that you can see the difference it makes.
Nothing is new on the web
We’ve talked about how a website is built, and we’ve looked at the specific roles played by HTML and CSS in that process. In particular, we’ve discussed the concept of HTML boxes and how a website is just a series of these boxes, stacked next to, below, and inside each other. Then, we’ve seen that the style of those boxes and their contents can be customized using CSS.
But what typically goes inside all those boxes, besides other boxes?!
With the internet now over 30 years old, most people have been interacting with the web a long time! We’ve developed collective expectations for how websites should look and feel as a result and, as such, most websites contain a set of immediately-recognizable components, including:
A header (a box permanently hooked to the top of the screen/page or to the top of a page section). This could contain other elements like a title, a logo, a navigation menu, etc.
A footer (similar to a header but at the bottom of a screen/page/section). This might contain elements such as text boxes for contact info or legal information, links, disclaimers, version information, etc.
A “main content area,” which might be a single rectangle or multiple rectangles of (un)equal size (such as a smaller “sidebar” and a larger “main panel”). This area may contain blocks of text, media such as videos, articles, graphics, etc.
Text blocks, which might themselves contain paragraph blocks, links, quotes, code, articles, lists, headings, etc.
Forms containing information-gathering widgets—elements users interact with to provide the page with information or direction, such as drop-down menus or sliders.
Modals (which you may know as “pop-ups”), which partially or wholly obscure the webpage and may contain additional information, options, or alerts.
Background tiles, which may hold images or instead be solid colors, gradients, or patterns.
Navigation systems, such as buttons, scroll bars, or drop-down menus, that allow users to move around a site.
All these elements (and more!) can be added to the websites designed using R Shiny. As such, some of the first, and most important, decisions you’ll make when building a Shiny app are deciding:
What elements your app will contain,
Where they will go, and
What they’ll enable a user to do.
While the list above is not exhaustive, it should help you begin to make those decisions.
Challenge
Consider the webpage below:

Like all webpages, this one is just a series of “boxes inside of other boxes.” Draw an abstracted version of this site as only a set of nested boxes. Label each box based on what it seems designed to hold (don’t bother drawing every box, just the “major” ones).
As you do, list the different components housed in these boxes you recognize (buttons, text blocks, etc.).
Here’s what I noticed and identified:
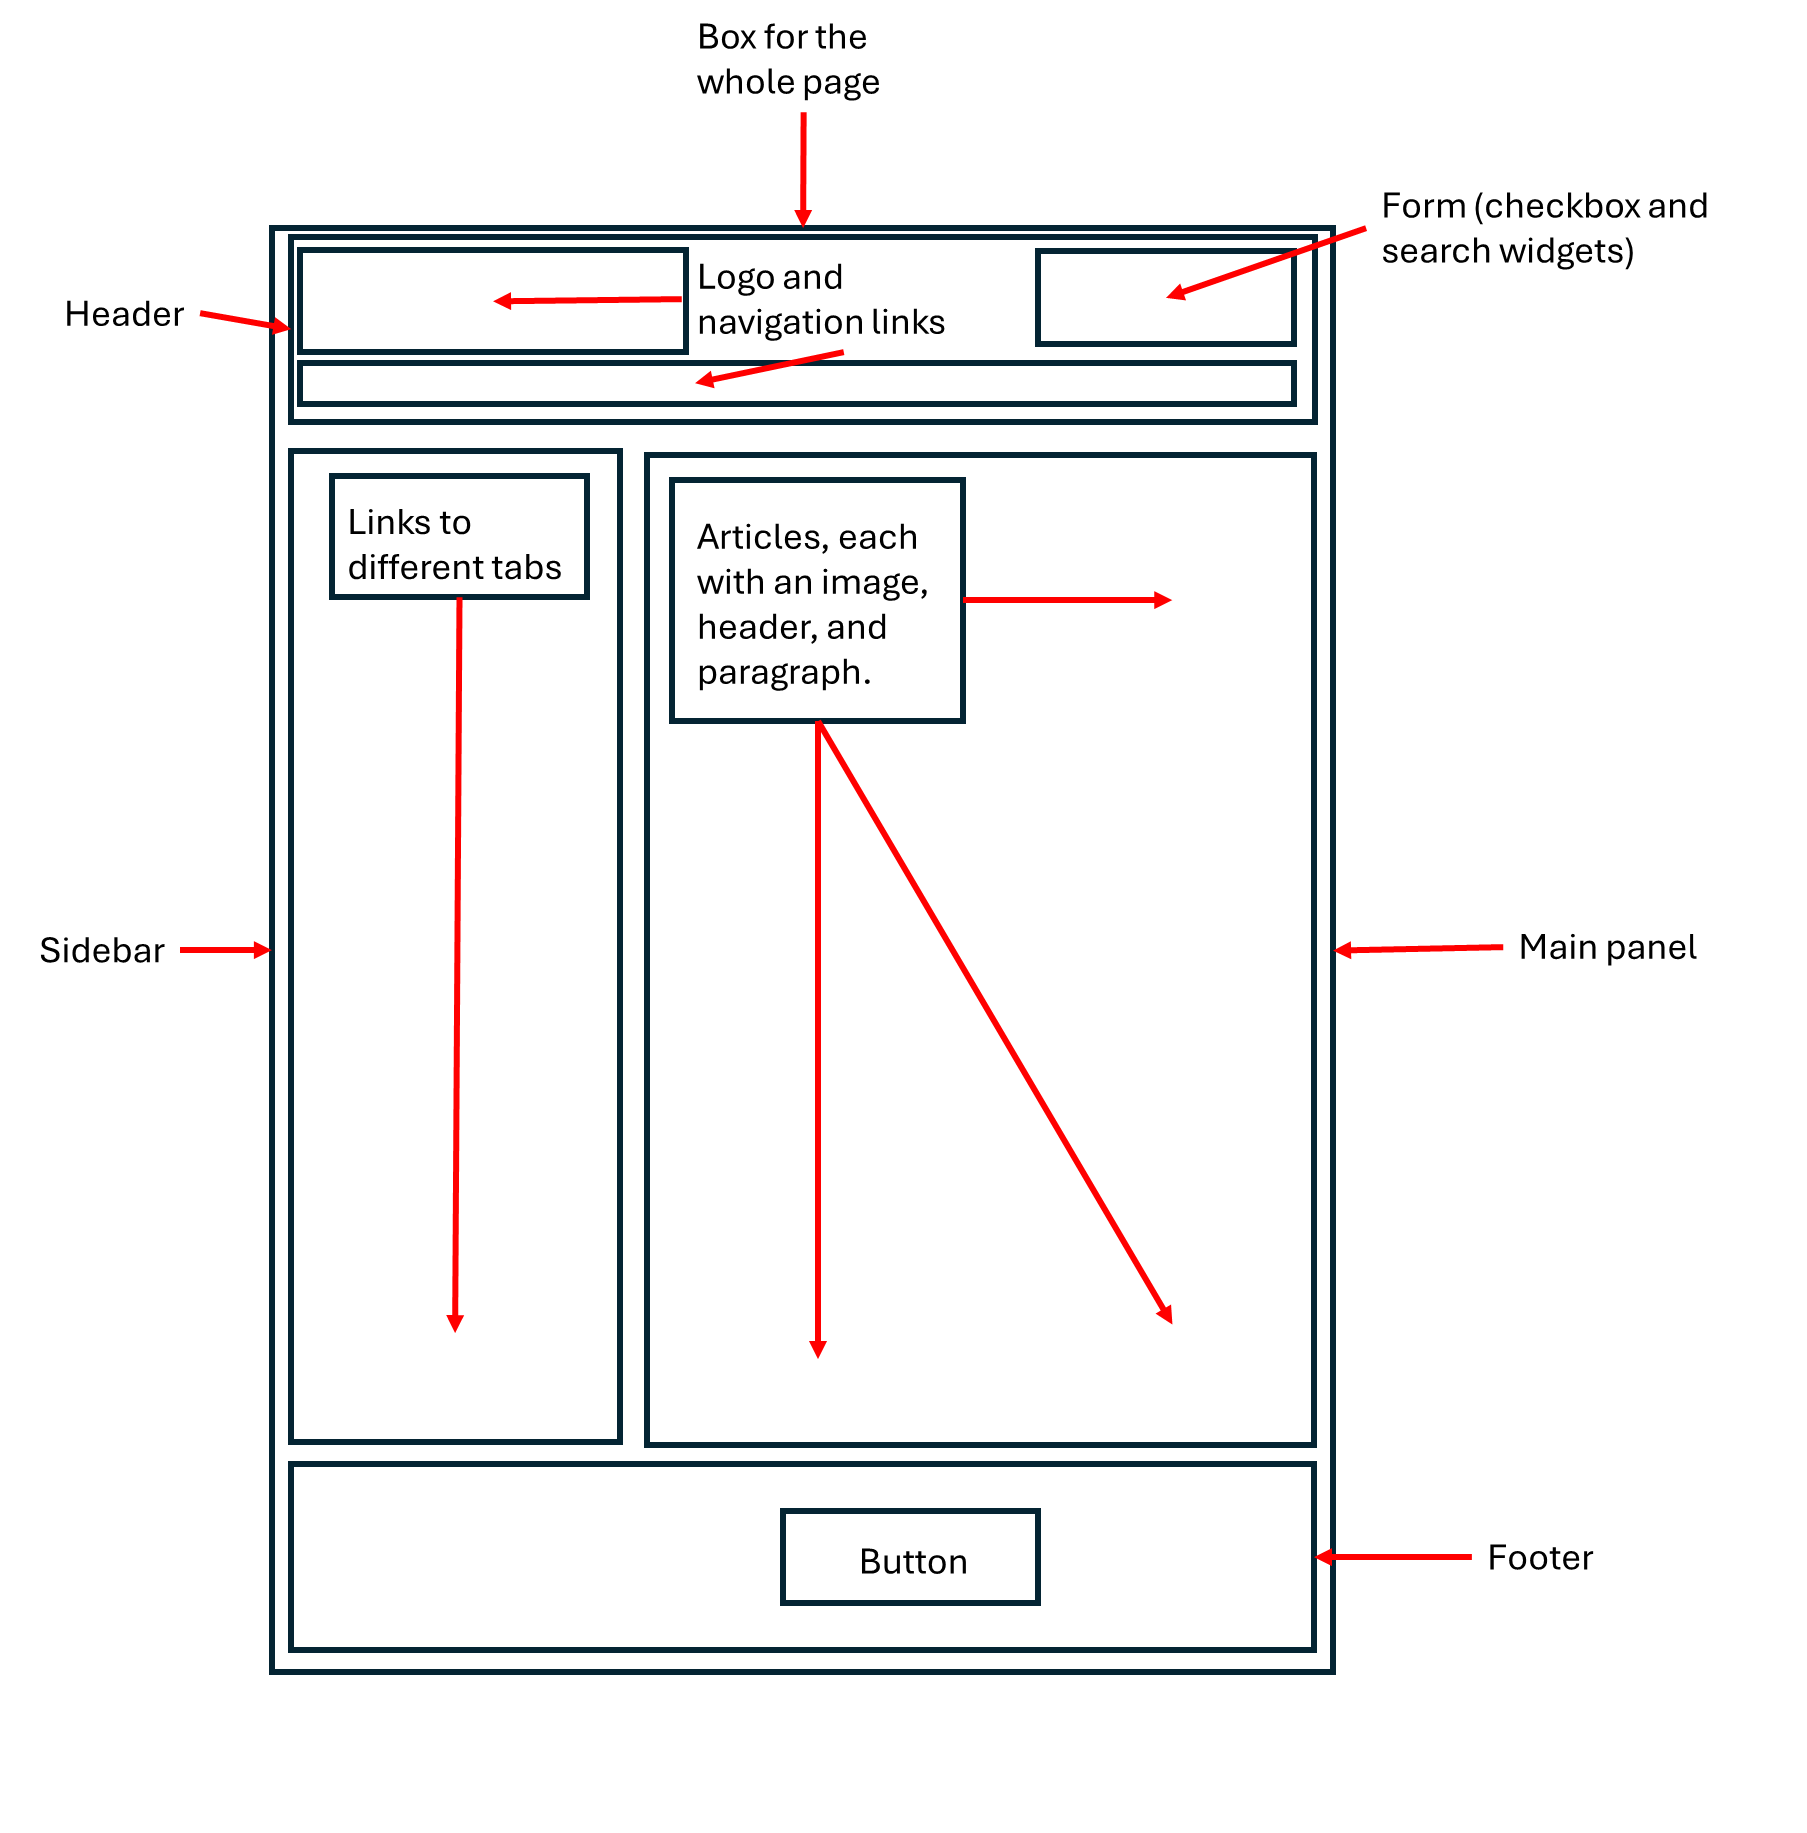
You may have noticed more, fewer, or different things—that’s ok!
Key Points
- Classically, websites are built using HTML, CSS, and JavaScript to construct the “client side” of the site, which runs in a user’s browser on their local computer, and by using SQL plus a general programming language like Python to construct the “server side” of the website, which runs remotely on a server that communicates back and forth with the user’s browser to ensure the site is constructed and displayed to the user as intended.
- R Shiny allows you to build a website using just R + R Shiny code, such that deep understanding of other web development languages like PHP and JavaScript is not required.
- However, some familiarity with HTML and CSS is practically essential to build a great app and to really understand what you are doing when writing “R Shiny” code.
- That’s ok—HTML and CSS are very approachable languages compared to general programming languages like R.
- HTML tells a browser what to put where when building a website. Websites are just “HTML boxes holding stuff and/or other boxes.” Some boxes force new lines after them; others don’t. How boxes will “flow” on wide versus narrow screens is an important design consideration.
- CSS tells a browser how to display each element on a website. It consists of rules targeting specific HTML boxes that specify new values for those boxes’ aesthetic properties.
- Website design has matured such that most websites look and feel broadly similar and share many elements, such as buttons, links, widgets, articles, media, and so on. R Shiny lets us add these same elements to our apps.