Building the Ground Floor of a Shiny App
Last updated on 2025-04-15 | Edit this page
Overview
Questions
- How should I start building a Shiny app?
- What code’s required to get a Shiny app to start?
- What goes in my
server.Rfile? Myui.Rfile? Myglobal.Rfile? - How do I design an app that’ll look nice on any device?
Objectives
- Build the files and folders needed to house a Shiny app and name them according to Shiny’s conventions.
- Value the convenience afforded by a
global.Rfile. - Link a stylesheet to your app.
- Structure your app’s UI in its
ui.Rfile by nesting (Shiny) HTML boxes, as you might more or less do using HTML code. - Use your browser’s developer tools to examine and troubleshoot your app’s HTML and CSS.
Preface
In the next lesson, we’ll start building a Shiny app together. In this lesson, we’ll tackle several important steps that’ll set us up for success in that endeavor.
(Detour: Installing packages)
In this lesson, we’ll begin to use some of R’s packages. If you haven’t already, install those now:
R
##RUN THIS CODE IN YOUR CONSOLE PANE--**DON'T** INCLUDE IT INSIDE YOUR SHINY FILES. YOU ONLY NEED TO INSTALL PACKAGES **ONCE**.
install.packages(c("shiny", "dplyr", "ggplot2", "leaflet", "DT", "plotly", "gapminder", "sf"))
Of course, to access their features, we need to turn these packages on too, but there are some other things we must do first.
Establishing our Shiny app’s Project Folder
It’s useful to make a single folder (our “root directory,” or root for short) to house all our app’s files and then make that folder an R Project folder. You don’t need to know what all that means if you don’t already—just know it’s valuable.
Here’s how to do it:
In RStudio, go to
File, then select the second option,New Project.In the pop-up that appears, select the first option,
New Directory.Next, we’ll select the type of project we’re creating. One of the options you’ll be presented is
Shiny application, but don’t pick that one! Instead, select the first option,New Project.-
On the next screen, use the
Browsebutton to find a location on your computer to place your project folder. Then, give the project a name, such asshiny_workshop, that befits your current project.- There are other options on this screen that, if you’re familiar with
Git or
renv, you might consider as well (both are recommended but outside the scope of these lessons).
- There are other options on this screen that, if you’re familiar with
Git or
Once you’re satisfied, click
Create Project.
Important: Once you’ve created your Project, you
should see a .Rproj file appear inside that folder. From
now on, to work on your Shiny app, launch this file to start an RStudio
session connected to your Project. Doing so will save you time and
energy!
Creating the necessary files
I recommend building Shiny apps using the so-called three-file system:
Go to
File, selectNew File, then selectR Script. Repeat this process two more times to create three scripts in total.-
Then, give them these exact names (in all lowercase):
ui.Rserver.Rglobal.R
These files will hold our app’s client side (user interface) code, back-end (server) code, and setup code, respectively.
R Shiny will recognize these exact names as “special,” so using them enables handy features. One of these is that, in the top-right corner of the Script Pane, you should see a “Run App” button with a green play arrow whenever you are viewing any of these three files in the Script Pane.
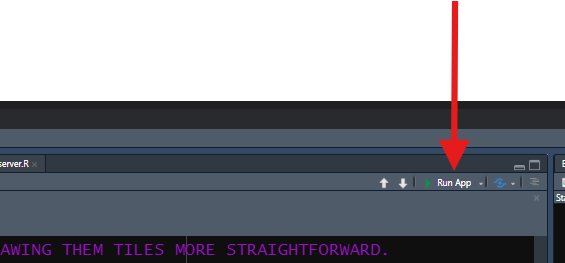
This button will allow you to start your app at any time to check it out or test it (something you should do constantly, both during these lessons and when developing your real apps!).
We need to start populating these three files with essential code, but before we do, let’s first create some more folders and files every R Shiny project should have:
-
In the “Files, Plots, Packages, etc.” Pane in your RStudio window, while viewing your Project Folder, click the
New Folderbutton. Name it exactlywww. R Shiny will automatically look inside a folder by this name in your root directory for many things, including media files (like images), custom font files, and CSS files referenced by your app.- Speaking of which: Click
File,New File, thenCSS file. Give this new file the namestyles.cssand save it in yourwwwfolder. We’ll put custom CSS code in this file to style our app’s aesthetics.
- Speaking of which: Click
Callout
If you plan to build complex Shiny apps, you may also want
to create a file for custom JavaScript code called
behaviors.js and place this file in www as
well. We won’t use such a file in these lessons, but because there is
more you can do using JS than R Shiny will easily do for you, there are
many instances where a little custom JS code can
significantly enhance your app’s behaviors, and having a
specific file in which to put that code is tidy.
For complex apps, I’d also recommend a folder inside your Project
folder called inputs. Use this folder to store input files
your app needs to start up, like data sets, that aren’t media
like pictures or fonts. We won’t use such a sub-folder in these lessons,
but, for real projects, it useful to have such a folder to stay
organized.
Similarly, I’d recommend a third new folder inside your Project
folder called Rcode. As an app’s code base gets larger, you
may want to divide your app’s code into smaller, more manageable chunks
(such as by building custom functions to perform repeated tasks or by
dividing your app’s code into “modules”). At that stage, you can place R
files for each chunk in this folder, then source those files in your
global.R file. We won’t use any such sub-folder, but I use
one for all my apps.
We now have all the files and folders we’ll need, so let’s work on getting our app to where it’ll actually start up.
Starting our global.R file
We’ll start with global.R. R will run this file
first when booting your app, so it’s job is to load and/or
build everything needed to enable the rest of the app to boot
successfully.
When your app gets large and complex, this file will hold many
different things. To start, though, at a minimum, it’ll likely contain
two: 1) library() calls to load required add-on packages
and 2) read*() calls to load required data sets:
R
##Place this code in your global.R file!

### LOAD PACKAGES <--CREATE HEADERS IN YOUR FILES TO KEEP LIKE CODE TOGETHER AND TO STAY ORGANIZED!
library(shiny)
library(dplyr)
library(ggplot2)
library(plotly)
library(DT)
library(leaflet)
library(gapminder)
library(sf)

### LOAD DATA SETS
gap = gapminder
By having a global.R file, we can place things like
library() calls and code for loading data sets in a single
place for the entire app. Without it, we’d need to place these commands
inside every app file in which they are needed—what a pain!
Starting our server.R file
Setting up server.R is relatively easy because
there’s only one block of code needed there to start:
R
##Place this code in your server.R file!

server = function(input, output, session) {

  #ALL OUR EVENTUAL SERVER-SIDE CODE WILL GO INSIDE HERE.

}
Notice: server.R will hold just one
object: a function called
exactly server. This function will have three
parameters called exactly input,
output, and session. R Shiny will look for the
function by this name when it starts an app, and it’ll create objects
called input, output, and session
to feed to that function as inputs during the start-up process. Using
these exact names is mandatory!
It makes sense, if you think about it, that our app’s server file creates a function (a verb) because it’s the “half” of the app that does stuff. By contrast, the UI of our app mostly “sits there and looks pretty” for the user, only changing in really profound ways when directed by the server.
Starting our ui.R file
Even less code is needed in ui.R to start
with—we need to place just a single HTML box into it, into which we’ll
eventually place all other such boxes we’ll build:
R
##Place this code in your ui.R file!

ui = fluidPage(

  #ALL OUR EVENTUAL CLIENT-SIDE CODE WILL GO INTO ONE OF THE TWO SECTIONS BELOW INSIDE OF THIS OUTERMOST SHINY HTML BOX.

  ### HEAD SECTION


  ### BODY SECTION

)
Here, we use an R Shiny HTML box called fluidPage() to
create a stretchy box that will hold the entirety of the webpage we’ll
build. We’ll soon fill this box with a bunch more boxes to give our app
it’s ultimate structure.
However, first, let’s link up our app’s stylesheet,
the styles.css file we made earlier. Because the UI is the
“visual” part of a website, and because CSS controls a website’s looks,
it makes sense we’d load a CSS file in ui.R instead of in
global.R or somewhere else. It also makes sense we’d put
this linkage in our app’s head HTML box because it’s
instructions for a user’s browser to consider, not something a user
themselves needs to see.
Here’s how to do this:
R
##Place this code INSIDE your app's fluidPage container in the HEAD sub-section!
tags$head(

  tags$link(href = "styles.css",
            rel = "stylesheet")
), #<--YOU'LL NEED A COMMA TO SEPARATE EVERY NEW ELEMENT IN YOUR UI FROM THE PREVIOUS/NEXT ONE, SO YOU WILL SOON NEED A COMMA HERE, WHETHER YOU ADD IT NOW OR NOT.
Here, we’ve told the app there is a specific stylesheet, a
CSS file, by the name of styles.css we want a user’s
browser to use when constructing our website. Note that we link
to this file rather than load it—that’s an HTML thing!
By default, the app will look for CSS stylesheets in the
www sub-folder, so as long as that’s where we put it,
we don’t need to provide more details than this to the href
parameter.
Jumpstarting our UI
Now, we can add some additional boxes to our fluidPage()
to start giving our app structure. In this series of lessons, we’ll
sort of practice a UI design approach called
mobile-first design. This means designing apps with
mobile users in mind first and all other users
second.
The logic of this approach is that, if an app looks and feels good on a narrow-screened, mouseless device, it should look and feel just as good, if not better, on a wider, mouse-enabled device more or less automatically. By contrast, ensuring that a website designed for a computer also works well on mobile devices tends to be harder.
This approach means, among other things, placing our UI elements with the assumption that they will need to adopt a “vertical” or “stacked” layout for mobile users. Pretty much every major element will get to use the screen’s full available width if it needs to, and each subsequent element will flow below rather than next to the previous one.
However, we’ll also set up our UI such that, if a user does have a wide enough screen, some things will arrange side by side instead. A wider layout will tend to look less quirky on a wider screen than a strictly vertical layout would because more content will fit on the screen at once and the added spatial constraints will keep elements from stretching too much horizontally.
So, with all that in mind, let’s add the following boxes to our app’s UI:
A header, built using
h1(), with theidattribute of"header"(h1s are top-level headings in HTML).A footer, built using
div(), with theidattribute of"footer".-
In between, a
fluidRow().- Inside it, we’ll place two
column()s, which will act as “cells” in this 1 row by 2 column “table.”
- Inside it, we’ll place two
The R Shiny function column() has a required input,
width; all width values of
column()s inside a fluidRow() must be whole
numbers that sum to exactly 12. So, let’s set the widths of
these columns to 4 and 8, respectively. In
practice, this’ll make the second column twice as wide as the first. As
a result, the second column will take up 2/3rds of the available screen
width, creating the feel of a left-hand “side panel” and a
right-hand “main panel,” a standard layout found across the web.
However, as we’ve discussed, fluidRow()s are “smart”—on
narrow screens, elements in the same row will flow vertically if there
isn’t enough room for them to fit side-by-side. This means that our
“side panel” will actually go above our main panel on a narrow
screen automatically (because it’s specified first), which will
be more intuitive for users encountering our elements vertically:
R
##Place this code INSIDE your app's fluidPage container in the BODY section!

h1("Our amazing Shiny app!",
         id = "header"), #<--EVERY NEW UI ELEMENT IS SEPARATED FROM EVERY OTHER BY COMMAS.

fluidRow(
  ###SIDEBAR CELL
  column(width = 4),
  ###MAIN PANEL CELL
  column(width = 8)
),

div(id = "footer")
A couple more things to note about R Shiny boxes at this point:
Most Shiny boxes have a
classparameter and anidparameter, just like their HTML analogs. These two parameters are always optional, and their purpose is to be targets in CSS selectors.However, if a Shiny box has an
inputIdoroutputIdparameter (and we’ll meet many that do!), those are mandatory; those serve Shiny-specific purposes (in addition to serving as CSS targets)—more on those attributes in the next lesson!Every Shiny UI element is separated from every other using commas, just like inputs inside a function call are. Forgetting these commas is a very common mistake for Shiny beginners!
Because R Shiny UI code is really just thinly-veiled HTML code, writing it involves nesting a lot of function calls inside other calls. For many, this can be confusing! Keeping your code organized using comments to create sub-sections can help you keep things straight.
Callout
Start up your app at this point by pressing the “Run App” button in
the upper-right corner of the Script Pane when viewing any of your
.R files.
I recommend using the drop-down menu on the side of the “Run App” button to select the “Run External” option, which will cause your app to launch in your default web browser instead of in RStudio’s Viewer pane or in a separate R window. In general, apps will perform better when run in a web browser, so you will get a more actionable impression of how your app is doing this way.
Discussion
What do you see when you start up your app? Explain why the app looks the way it does so far.
Besides our title we placed as contents inside our header, our app will actually look completely empty!
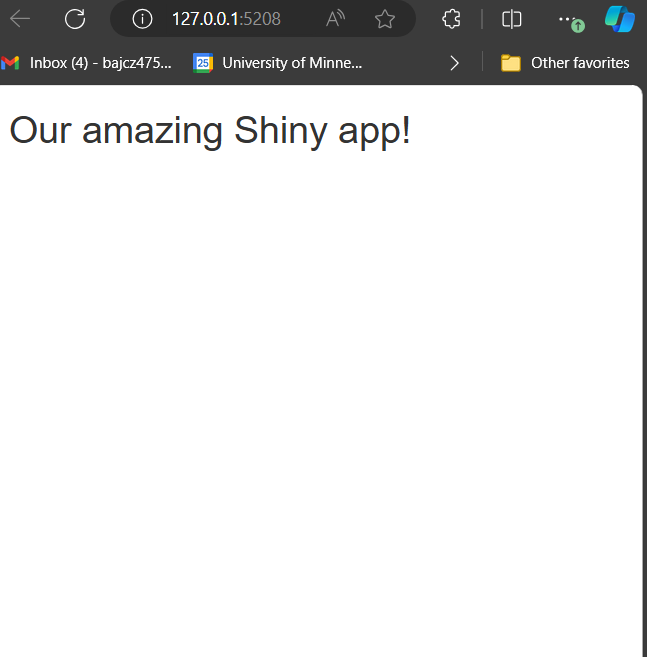
This is because we have introduced several HTML boxes (a footer, a side panel, a main panel, and a box holding the latter two), but we haven’t actually put anything in those boxes that isn’t just other boxes!
That is to say that HTML boxes are empty until we provide them with contents that aren’t other boxes. That’s what we will do in the next lesson!
By most standards, our app also looks very basic—just a white screen with a generic-looking title. This is because the default CSS applied to Shiny apps is very basic, as I warned in the previous lesson! This is why I argued that learning some CSS is essential to craft attractive apps.
What about our CSS file we linked in, though? Sure, we’ve linked to our CSS stylesheet, but we haven’t actually put any code in it yet. Until we do, Shiny’s default, bland rules will be used.
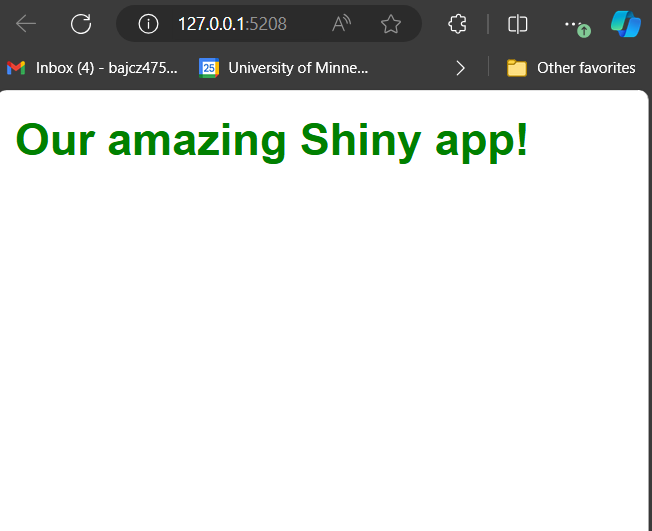
Challenge
Let’s make our first style rules! Since there’s nothing else to style
yet, though, let’s style our title. In your styles.css file
(which you can open in RStudio), write a rule that will
make the title of our app green and bold.
The first property to set here is called
font-weight, and the new value for this property should be
bold. I’ll leave you to figure out what the second
property-value pairing should be! Run your app to make sure your rule is
working.
Here’s what our CSS rule should look like:
CSS
h1#header {
font-weight: bold;
color: green;
}
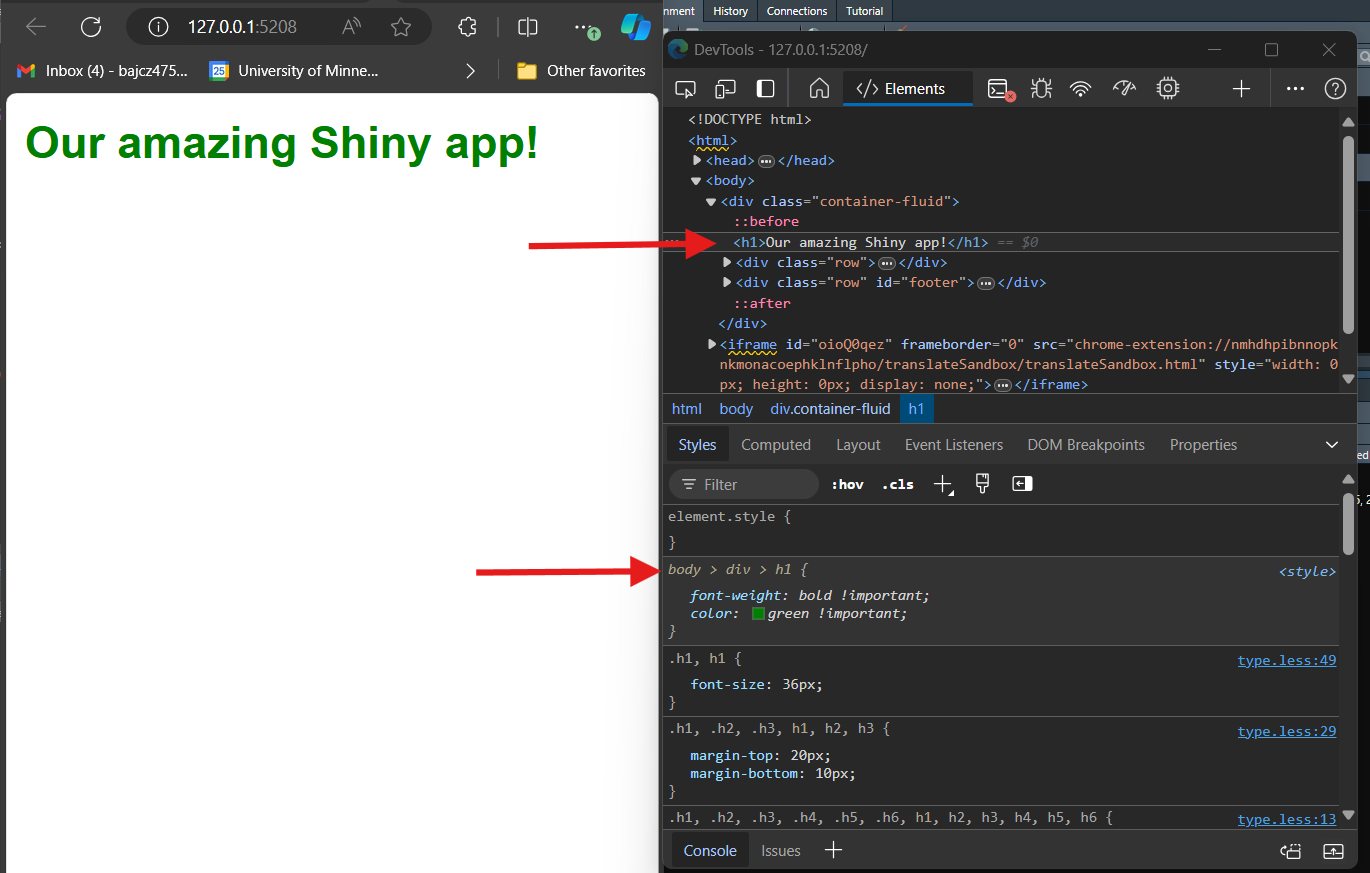
/* You could also have simply put #header in the selector, as no two HTML containers are allowed to have the same id anyhow! And this is what our app should look like once you apply the change:
If your app doesn’t look like this, there are two things you should try:
Perform a hard refresh on your browser. In Edge, this can be done using Control + F5. This will refresh the page and clear your browser’s cache for your app. This is sometimes necessary to clear out old CSS your browser may be using and apply new CSS.
Ensure that your CSS file is properly linked to your app (see earlier in this lesson).
If neither of these suggestions resolves your issue, read on to learn about another tool you might be able to use to troubleshoot CSS issues like this!
Meeting the Developers Tools dashboard
In this lesson, we gave our header an id, which made it
easier to target it with a CSS selector. What happens
if you want to target a specific element of your app, but you
aren’t sure what selector to use to do that?
Good question: Let’s introduce you to every web developer’s secret weapon—your browser’s developers tools.
Every browser has a slightly different way of launching its
developers tools. Personally, I use Microsoft Edge as my browser. To
access developers tools in Edge, right-click any element on any website
and select the last option in the resulting menu,
Inspect.
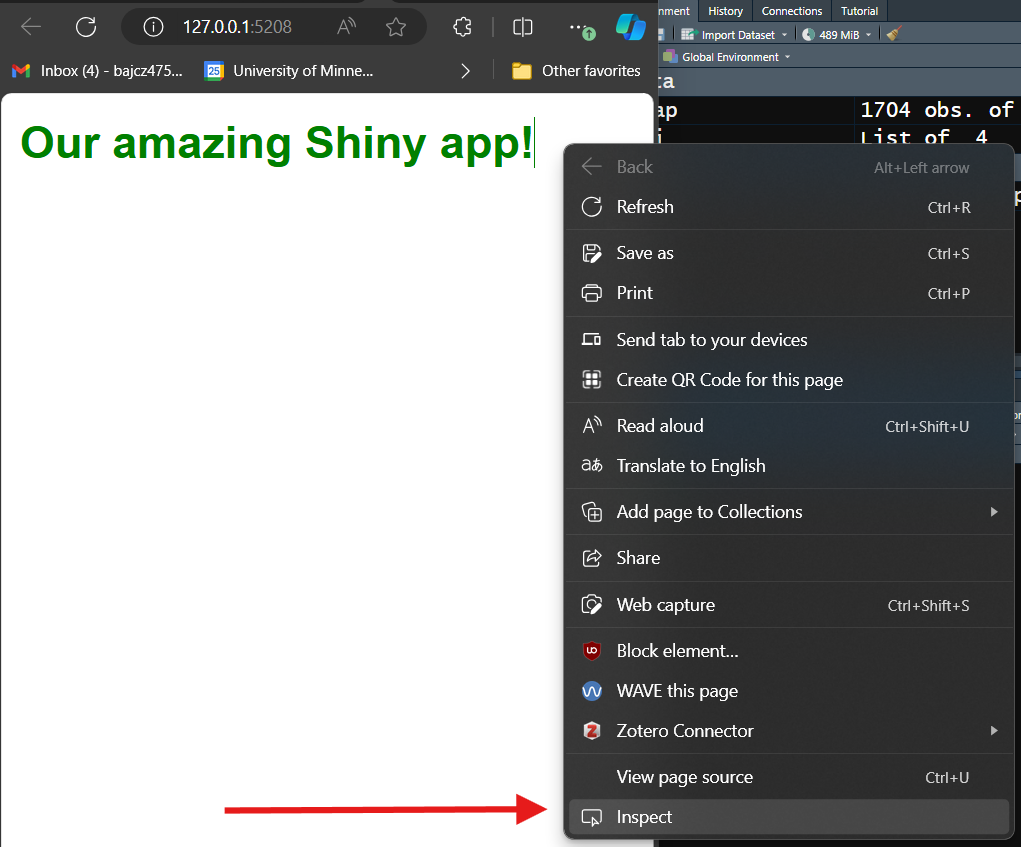
The workflow you might need to use for your browser of choice might be different.
Once you figure out how to open up your browser’s developer tools, you’ll see that it’s a frankly intimidating window showing, among other things, the HTML of the website you’re on (usually on the top or left) and the CSS of the element you’re inspecting (usually on the bottom or right):
If I didn’t know the right selector to use to target an element, I
could right-click on that element in the HTML (see picture above), go to
Copy in the resulting menu, and then select
Copy selector from the resulting sub-menu:
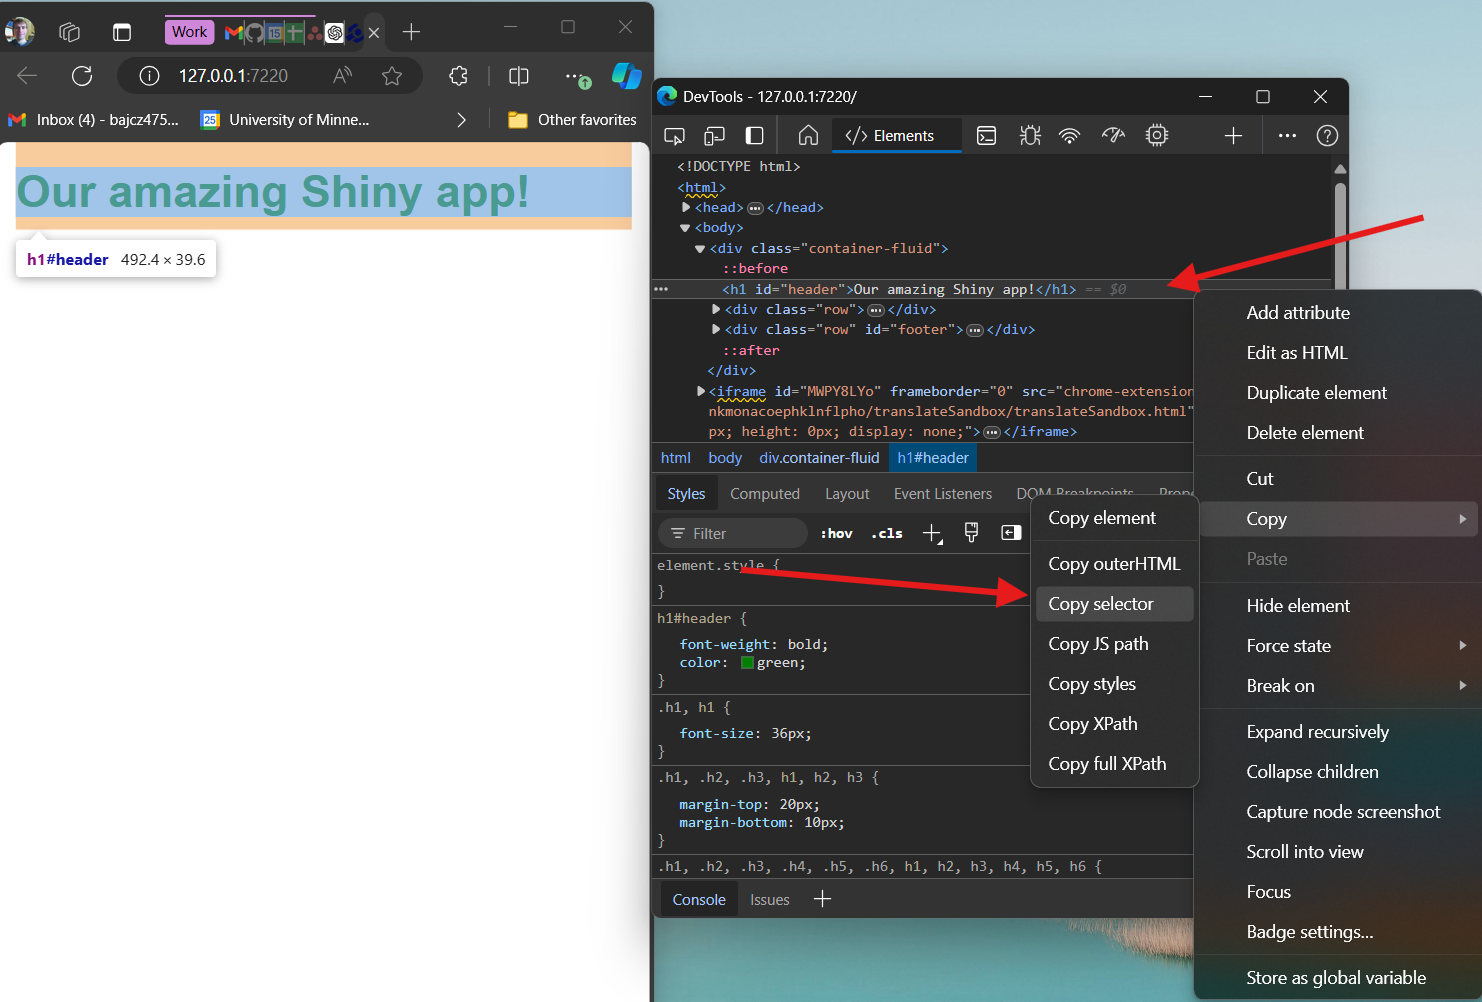
Doing this would put #header into your clipboard, in
this case, which could then be used in a CSS rule as a selector moving
forward.
The CSS section of the developers tools will also list all the rules that are currently affecting a given element, which properties are being modified, and which new values are being set. If your CSS code isn’t working as intended, you can check here to ensure your code is being recognized and applied correctly.
These are just two of the many ways that developer tools is a useful web development tool. I won’t mention it again in these lessons, but it’s essential you know how to access it!
Key Points
- Use the three-file system to organize your app’s code to benefit from several R Shiny features within RStudio.
- A
global.Rfile is handy for storing all the code needed to fuel your app’s start-up and any other code your app needs that only needs to run once. - A CSS stylesheet holds CSS code for dictating your app’s aesthetics.
One can be linked to an app inside of
ui.Rusingtags$head(). - UI elements get nested inside one another and must all be placed
inside our UI object’s outermost container (here, a
fluidPage()). - Most UI elements can be given
idandclassattributes use in CSS selectors. UI elements must be separated from one another in the UI with commas. -
fluidRow()andcolumn()can be used to create a “grid,” within which elements may arrange next to each other on wide screens but vertically on narrow screens, creating a responsive, mobile-first design with little fuss. - CSS styling requires using the right selector to target the right element(s). If you aren’t sure of the right selector to use, you can retrieve it using your browser’s developer tools.